Sewing Tutorial: Bias Binding on Curved Edge (Sew in the Ditch)
- Yuzu and Pear

- Nov 21, 2017
- 2 min read
Updated: May 29, 2020
This is another application of bias to curved edges, however there will not be any topstitching shown on the right side of the project (see here).
Most of my students tend to find it a little harder to master, but i do think it’s good to have this in your sewing repertoire. It’s very satisfying to see the stitches concealed in the ditch especially when a matching thread is used.
In this demonstration, contrast thread has been used. For your project you may use a matching thread for a more inconspicuous look.
STEP 1: PREPARE BIAS TAPE

In this demonstration, i’ve used a 3cm (2 1/4″) wide bias tape. The tape is NOT folded into equal halves. One half is slightly bigger than the other. Then, the long edges are then folded toward the centre crease line.

The image above shows the bias tape in detail. You can see the top half is bigger than the bottom half.
STEP 2: FIRST STITCH LINE

With the right sides together, align the bias tape along the curved edge. Please make sure the bias tape is oriented such that the narrower quarter is closer to the curved edge.
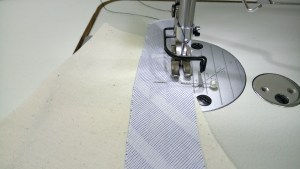
Stitch the first row at the first crease line. Adjust the bias tape as you go to match up at the curved edge.

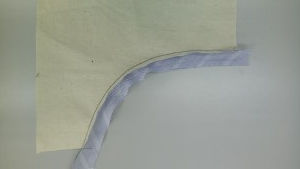
This is how it looks like on the right side.
This is how it looks like on the wrong side.
STEP 3: PRESS BIAS TAPE OVER


This is what it looks like on the wrong side.

The above shows the details. Make sure the bias tape covers the first line of stitching.
STEP 4: SECOND AND FINAL STITCH LINE

From the right side, sew the second and final stitch line in the ditch.

This is what it looks like from the right side.

As you can see, if a matching thread has been used, the final stitch line would not be observed from the right side.

This is what the wrong side would look like.


Comments